NOTICE:
I did not take responsibility for any loses due to the usage of the information from this blog post. Please take extreme precaution while following this procedure. Thank You.
[Lihat Bahasa Melayu]
IBM / Lenovo save password (POP and Supervisor Password) in a EEPROM Chip call ATMEL 24RF08. These password couldn't be remove simply by resetting any jumper or unplugging any battery or backup battery. The only way is to read the password stored in the chip. To achieve this, you have to send in the laptop to the manufacturer together with prove of ownership.
But, we can hack this (by reading the EEPROM chip using homebrew EEPROM Reader and reader software from ALLservice.ro.
Thing we need:
- EEPROM Reader (homebrew)
Parts:
1. D-Sub 9pin female COM header,
2. 2 units 5.1v Zener Diod
3. 2 units 2.2 Kilo Ohm Resistor - Software
Get the software from http://www.allservice.ro/ iaitu r24rf08_setup.zip and setup_ibmpass21.zip
details as follow:
http://www.allservice.ro/forum/viewtopic.php?t=61 – r24rf08 - Reader http://www.allservice.ro/forum/viewtopic.php?t=56 – IBMpass 2.1 Lite
Build the EEPROM Reader
EEPROM Reader schematic.
EEPROM Reader schematic.
 Figure 1: EEPROM ATMEL 24RF08 Reader Diagram.
Attach the Reader to ATMEL 24RF08 EEPROM
From the site where I first get the information about hacking this BIOS password, it is suggested that we solder two wire to EEPROM pins to connect the reader. I thought it will be disasterous and would void the warranty.
I soldered a needle to the wire from the reader, one for SDA and one for SCL. For the GND wire, I suggest you attach a aligator clip to clip the GND wire to any GND point on the mainboard. For my case, I clip the GND to the jacket of USB port near the EEPROM.
With this method, you need to have a very steady finger to hold the needdle in place. I used both hand to hold the needdle. One needdle in one hand. You have no more hand to operate the PC. Get your buddy's help. I ask my wife to press ENTER.
The Location of AMTEL 24RF08CN on R40
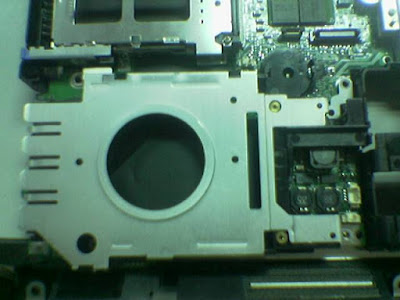
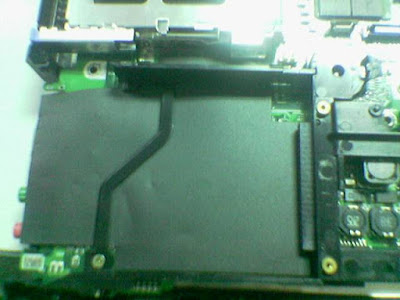
EEPROM Chip AMTEL 24RF08 is located beneath the plastic protective sheet under the harddrive compartment.
.jpg) Photo #2: Harddrive compartment
Photo #2: Harddrive compartmentRemove the aluminum cover. You have to remove two screws. One in the small hole at the bottom of the picture and the other one is on the bottom right side of the cover.
.jpg)
Photo #3: Plastic Protective Sheet
You have to peel the plastic sheet to uncover the EEPROM. Be very careful not to tear off the sheet. We need to replace is later on the board. The sheet is fastened with double sided tape on the audio jack. Peel it from there.

The attached PCMCIA removed and the protective sheet has been peeled to give us a clear view to the EEPROM.
EEPROM Reading Procedures
To complete this procedure, you need to have another pc (secondary pc) with spared COM Port.
Step 1:
Attach EEPROM Reader to COM Port (other pc or laptop with COM Port), then open up Command Prompt. (Under Windows XP, Click on Start-->Run then type in CMD then press ENTER. Go to the folder where r24rf08 is installed.
C:\>cd C:\ALLservice\24RF08 then ENTERtype at the command prompt
C:\ALLservice\24RF08>r24rf08.exe r40dump.binDon't hit ENTER yet. (C:\ALLservice\24RF08 is where your r24rf08.exe located)
Step 2:
Turn on your ThinkPad (Please be really careful). Wait until your ThinkPad is prompt you to enter password (when big padlock icon appear).
Step 3:
With precaution (be really careful, bro), attach GND wire to any GND on the board then attach or touch the two needdles which connect to SDA and SCL on the ATMEL 24RF08CN EEPROM.
Step 4:
Now, press ENTER (my wife did -- both my hand holding the needle), wait for a moment until reading finish (appox. 10 to 20 seconds). In the same folder as r24rf08.exe, a new file named r40dump.bin has been created. Now you can power off the ThinkPad and reassemble the unit.
Langkah 5:
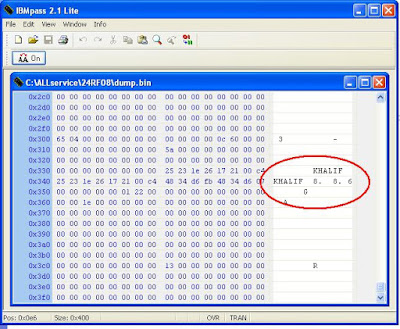
Run IBMpass 2.1 Lite that you have installed earlier. Click Start --> ALLservice --> IBMpass 2.1 Lite. Open the file r40dump.bin from the C:\ALLservice\24RF08. Scroll down to address 0x330, you could read the password right there. If you can not read the password (or files did not show anything), make sure you click on the icon "AA off" to "AA on". That's all.
Type in the password at ThinkPad, in my case, the password is KHALIF. I have succesfully boot this ThinkPad. KHALIF is a person name -- We believed he (a teacher) is the previous user of this laptop, and before he relocated to another school. he didnot reset or tell anyone the password, but return the laptop to school administration.
p/s: Sorry for the bad quality of the images. Those images taken using Nokia 6600 camera phone. To seek more help from me, please send short text message to +6o-12-96o82o8 and email me at spokdogol AT gmail DOT com
References:
References:
http://sodoityourself.com/hacking-ibm-thinkpad-bios-password
http://www.allservice.ro/
Further Readings:
1. ATMEL 24RF08 datasheet
NOTICE: I did not take responsibility for any loses due to the usage of the information from this blog post. Please take extreme precaution while following this procedure. Thank You.
1. ATMEL 24RF08 datasheet
NOTICE: I did not take responsibility for any loses due to the usage of the information from this blog post. Please take extreme precaution while following this procedure. Thank You.
.jpg)

.jpg)


0 Comment:
Post a Comment